How to Remove Tile: A Step-by-Step Guide
Need a design change on a budget? Update your bathroom walls or floors in 5 steps.

The Easy Way to Remove Tile from Your Bathroom Floor and Walls
Nothing dates a bathroom quite like old tile. Whether your walls are sporting a color that went out of style with eight-track tapes or your floor shows too much wear, creating a bathroom you want to spend time in starts with tearing out the old-fashioned tile.
Luckily, this job doesn’t call for much DIY experience. The work will only take a day or two and isn’t a complicated process. We’re here to walk you through how to remove tile yourself safely and efficiently.
Common FAQs
How Much Does it Cost to Remove Bathroom Tile DIY-Style?
The cost of DIY ceramic tile removal is approximately $1 - $2 per square foot based on the size of the job, tools bought or rented and debris disposal.
Consider a 10 yard dumpster for tossing out damaged bathroom tile and outdated fixtures, like a toilet. With the average dumpster rental cost only $391, you can remove and dispose of tile cheaper than the contractor labor fee of tile disposal alone.
What's the Average Cost to Hire a Contractor for Ceramic Tile Removal?
The national average is $3 - $5 per square foot of ceramic tile for tile removal by a professional. Most contractors charge closer to the higher end of that range, depending on where you live.
For example: If your bathroom is 100 square feet, expect to pay between $300 and $500 for a tile removal job.
Additionally, there's the cost for ceramic tile disposal ($4 per square foot), replacement materials and professional labor to install it.
How Long Does it Take to Remove Bathroom Floor and Wall Tile?
Only 1-2 days on average. It may go quicker if you've prepped the room and have your tools ready. The work isn't complicated but it can get tedious. Remember how much money you're saving by removing the bathroom tile yourself and use that as motivation to complete the job in no time.
5 Steps for Removing Old Tile
Follow these five simple steps to bathroom floor and wall tile removal. Remember that tool and area preparation is half the work. Wear your safety gear, cover any fixtures from potential damage and consider inviting a productive buddy to assist you.
Step 1. Round Up Your Materials
The number one thing you should know about tile removal is that it kicks up a lot of dust. Pieces of ceramic tile can cut you, so don't skimp on safety gear and be careful transporting the debris outside. If you're removing tile in a small bathroom, consider a dumpster bag. However, most bags won't hold much ceramic tile and finding a company to haul it away is tricky as they don't always service to your area. Try renting a roll off dumpster as a hassle-free alternative for tile disposal.
Don't want to purchase tools for single use? Consider renting them from your local hardware store.
Tool and Supply List
Tools | Safety Gear |
|---|---|
Chisel | Boots |
Pry bar | Face mask |
Hammer | Work gloves |
Shop-Vac | Safety goggles |
Utility knife | Long pants |
Masking tape | Long sleeve shirt |
Plastic sheeting | |
Reciprocating saw |
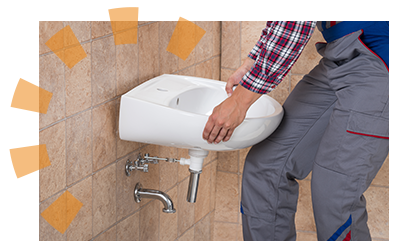
Step 2. Remove Vanity (and Toilet)
You’ll need to uninstall your toilet and vanity so you can work freely. Use our quick, handy guides to walk you through this step:
If you plan to keep these fixtures, store them in and out of the way while you work. Otherwise, go ahead and toss them in your dumpster.
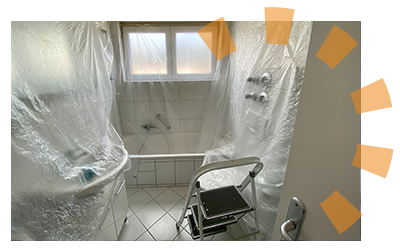
Step 3. Protect Your Fixtures
When the hammers start swinging, you’re going to stir up a lot of dust and debris.
- Take down glass shower doors to protect them from damage or remove shower curtain, along with any window treatments so they won’t collect dust.
- Temporarily store your mirror in another room if it isn't attached to your vanity. Cover with a sheet of plywood if attached.
- Tape plastic sheeting over the door, vents and registers in the room to keep dust from filtering into the rest of your house.
Safety Tip
If your bathroom was built before 1978 and has paint on parts of the wall, test the paint for lead before you start removing tiles. Lead isn’t very dangerous when it’s left undisturbed; but when it’s chipped, the dust can be extremely harmful — especially for young children.
Once you’ve got the plastic up, remove any baseboards in the room. If you’re planning to reinstall them, here’s how to remove them without damage:
- Cut through the paint along the top, bottom and sides of each board with a utility knife.
- Slide a putty knife behind the baseboard near the molding around the door and gently pry outward to loosen the nails.
- Move down the wall, repeating this process every six inches or so until the entire board is free.
- If the board is wedged between surrounding molding, carefully rock it up and down to loosen it.
- Label the back of each board with its location so you can put everything back in the right place.

Step 4. Tear Up Floor Tiles
Time for the demolition work to begin. The easiest way to remove a tile floor is to start at the doorway, where your bathroom floor meets the adjoining room or hallway and work your way in. Remember to clean up loose tile as you go so you always have a clear, safe work area.
How to Remove a Tile Floor
- Use a hammer and chisel to break up one of the tiles at the edge of the doorway.
- Work your chisel under the next tile and use the hammer to pop it free.
- Continue this process until you’ve removed all of your flooring. If you have a hard time loosening tiles, use your chisel to break up the grout lines first.
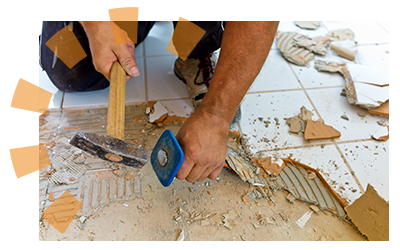
Safety Tip
Take a look at the adhesive layer underneath the first tile you pry up. If your bathroom floor was installed before 1984 and the adhesive is black and tar-like, it may contain asbestos. Stop your work and call in a professional tile remover who can handle asbestos safely. In the meantime, keep the room closed off so that no one disturbs the material.
Step 5. Take Down Bathroom Wall Tiles
Time to move from the bottom of the room to the top. The best way to remove wall tiles is to start at the top and work your way down. Remember to take frequent breaks to carry discarded tiles out to your dumpster so they won’t trip you up as you work.
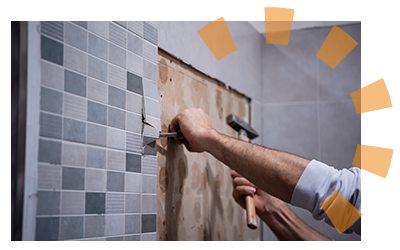
How to Remove Tile From Walls
- Break up a tile at one of the top corners of the room using a hammer and chisel. It’s easier to start with one of the rounded tiles on the edge of your shower.
- Work in a horizontal line along the top of your starting wall, inserting your chisel under each tile and using the hammer to pop it loose.
- Cut through exposed drywall using a reciprocating saw. Be careful not to sink the blade into the studs. If you’re having a hard time, remove another row or two of tile first.
- Slide a pry bar into one of these openings and exert pressure to pry down a section of the tile and backing.
- Continue around the room, using this process to remove all wall tiles. Make sure you always have firm footing before you start prying.
What Comes After Tile Removal?
With your DIY tile removal job behind you, your bathroom is a blank slate you can turn into a true oasis. Check out our tips for remodeling a bathroom on a budget or consider using the money you saved to put towards another diy project like insulating your attic or finishing your basement.
Got some more demolition work to do before your bathroom is remodel-ready? Use our complete bathroom demo guide to get the job done.
What Do You Think?
Have thoughts on this diy bathroom project? We're listening. Head over to Twitter or Facebook,
and use #dumpstersblog to join the conversation.


