Removing Hardwood Floors: An In-Depth Guide
Follow these easy steps to get rid of those beat-up old wood floors the DIY way.

Tips to Get Rid of Hardwood Flooring Yourself
Pulling up your old wood floors may seem like a big undertaking, but if you follow these steps and take the right precautions, it’s a project you can do yourself to give any room in your house a refresh. Learn how to tear up your wood floors quickly and safely with expert advice from Gutster Tools, Arizona Home Floors and Cleveland Hardwood Restoration.
How Much Does It Cost to Tear Out Wood Flooring?
If you choose to hire a pro to get rid of your old wood flooring, you will most likely pay around $1.22 to $2.38 per square foot according to Homewyse. You can expect to pay more if your flooring is very old and requires more work to disassemble and remove. Additional costs can be added if your subfloor also needs to be repaired or replaced.
"We usually quote around $2 per foot, which would include any repair work needed on the subfloor and removing trim."
If you’re planning to turn it into a weekend DIY project, the cost of ripping up wood floors is generally only the price of the tools and gear needed for the project. You can even save some extra cash if there is a local tool library near you to rent the tools you’re missing.
Depending on what size room you’re working in and what you are going to do with the wood after, you may need to rent a dumpster to dispose of the debris. Later in this post, we will discuss how to dispose of the wood and if it’s qualified to be recycled or reused.
How to Master DIY Hardwood Floor Removal in 5 Steps
Step 1: Gather the Right Tools for the Job
Hardwood Floor Removal Tools and Gear
Tools | /////Safety Gear |
|---|---|
Circular saw | Safety glasses |
Pry bar | Dust mask |
Mallet | Gloves with padded palms |
Nail claw | Kneepads |
Curved vice finger grips | Long pants |
Large magnet | Boots |
Shop vacuum | Tarps |
Roll off dumpster |
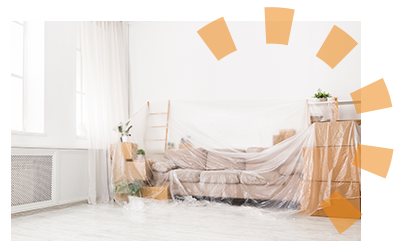
Step 2: Prepare to Tear Out Your Wood Floors
Before you get started, you’ll need to spend some time getting the space ready to be under construction.
- Clear out any furniture and declutter the room.
- Cover light fixtures and anything that cannot be removed with a tarp to protect from dust and debris.
- Pull up any heating vents from the floor and remove your baseboards.
- Put down tarps in adjoining rooms to keep the dust from traveling.
"Plastic attracts dust, so it would be better to use a cloth tarp or an old bed sheet to cover items in the room you want to protect from debris."
Depending on how many rooms you’re tackling, you could complete this project in a weekend. We have some great tips for how to stay in your home during a remodel without disrupting your routine.
We know this may seem like an in-depth project, but we broke it down into these five basic steps so you can master it yourself. You’ll soon see the biggest part of this DIY project is the cleanup process.
Step 3: Protect Your Subfloor and Prepare Your Hardwood
Hardwood floors are attached to a plywood base called a subfloor with either nails or glue. Most often, the hardwood has been glued as well as nailed to prevent squeaking. Removing your hardwood floor without damage to the subfloor is crucial.

"When removing your hardwood floor, you need to determine and confirm the structural integrity of the subfloor. In the event the subfloor is loose or damaged, you must repair this before installing any new flooring. If you skip this step, your new floor may squeak or worse, possibly become loose and pull away over time."
Cut Your Hardwood Into Small Sections
If you are not planning to reuse the wood or donate it, it will be easier to remove by cutting into small sections. Flooring that is both glued-down and nailed will be the toughest to remove.
- Carefully set your saw to slightly less than the thickness of the flooring so you don’t damage or cut through your subfloor.
- Cut lines with your circular saw perpendicular to the direction the wood is laying. Cut each section about one to two feet wide.
Safety Tip
You will create a ton of dust with this step, so make sure to wear your dust mask and safety glasses.
"Most homeowners don't think of hardwood removal as being dusty, but the process of cutting the wood into manageable strips and prying them up will create dust," Giammarino said. "There is also a considerable amount of dust that is created when grinding the floor to remove hardwood glue. Silica dust has been linked to causing lung cancer and it's best to avoid it by wearing a heavy-duty mask. It's always best to find a dust-free option or a strong vacuum if one can be obtained in your area."
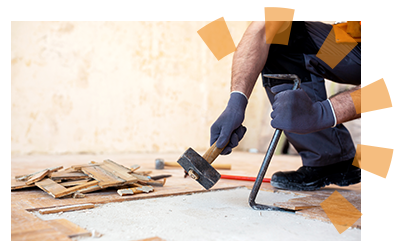
Step 4: Pry Up the Hardwood
Once all your flooring is cut into sections, you can tear out the wood using your pry bar and mallet. This is where your knee pads are going to come in handy.
Pro Tip: Always pry the boards in the same direction they are nailed down to help prevent cracking and splintering.
Step 5: Clean up the Debris
Once you get all the hardwood torn up, you’ll notice you have quite a mess on your hands. Most wood floors are secured with nails, so along with your pieces of wood, you’ll have a lot of metal debris to collect.

How to Remove Nails from Hardwood Planks
- If you are left with nails or staples in the subfloor, now is the time to grab your nail claw tool and get to work.
- Insert the claw under the nail or staple, rock back and it should pop right out.
- If you happen to have some broken nails or staples that need removed, your curved vice grips will come in handy to pull them out.
Quick Tips for Collecting Your Debris
- Make sure you have a lined, large garbage bin available to hold all the wood and debris that isn’t salvageable.
- Using a large, handheld magnet is great to make sure you have collected all the stray nails and staples.
- Sweep up the remaining sawdust, smaller wood chips and any other debris, then vacuum up with a shop vacuum.
You might consider renting a roll off dumpster to have in your driveway for easy disposal of your debris to save yourself multiple trips to your local dump or landfill.

3 Ways to Give Your Wood a Second Chance at Life
"Wood that is broken, loose or has been sanded too many times is what you might consider saving to reuse for another project," said Jessie Bennett of Cleveland Hardwood Restoration. "Wood flooring can usually only be sanded five to six times in its lifetime. From 1,000 square feet, once it's removed and de-nailed, you have only about 150-200 square feet left of reusable wood."
If some or all of your wood is salvageable, you have a few options for reuse. Keep in mind that glued-down hardwood is seldom recyclable. You can recycle or donate any of the wood that is not moldy or damaged.
Options for Repurposing Old Hardwood Floors
- Post your wood as a free pickup listing on Craigslist or Facebook Marketplace.
- Donate to Habitat Restore if it is at least five inches in length and in good condition.
- Test out your crafty side and check out Google or Pinterest for some ways to use old hardwood flooring.
"If your torn up wood is 100 years old and you can’t imagine just throwing it into a landfill, there are many places like Old School Architectural Salvage or the Rebuilders Xchange here in Cleveland, who will take it, denail it and reuse it for another project such as table tops, wall coverings (think shiplap style) or raised planter beds. I've even seen old, unfinished wood used for cooking or campfires."
Fresh Starts: Choose Your New Flooring
Now that the hard work is over, the fun can begin! It’s time to choose new flooring for your family.
Not sure what you want to install? Check out our flooring trends study for some inspiration.
Expert Contributors
Ralph Markham
Ralph is a demolition bar supplier for Gutster Tools. Based just outside of Newark, his company's orange demo bars assist DIYers all over the country with a variety of projects and help to maintain a healthy posture during the job.
Nick Giammarino
Located in Tempe, Nick is part of an expansive team of flooring specialists with over 80 years of combined service. Arizona Home Floors is DustRam® Certified Contractor, specializing in removing old flooring with the cleanest methods available.
Jessie Bennett
Working in Cleveland and all surrounding areas, Jessie and their team take pride in providing versatile and socially conscious wood restoration services for residential and commercial flooring and furniture. Their flooring is custom milled to order from two primary sources, including Sheoga Hardwood Flooring & Paneling in Middlefield, OH which is Sustainable Forestry Certified.
Other Sources
Cost to Remove Flooring. (2022, January). Retrieved from Homewyse.com
What Do You Think?
Tearing out your old hardwoods? We're listening. Head over to Twitter or Facebook,
and use #dumpstersblog to join the conversation.
Next Up


