How to Remove Vinyl or Linoleum Flooring
Get rid of your old flooring to modernize your space from the ground up.

Learn the Best Way to Remove Vinyl Flooring Yourself
Fresh flooring can transform a room—but it doesn’t come cheap. If you’re looking to save money on your upcoming remodel, removing your worn-out vinyl or linoleum yourself is a great way to keep more money in your budget. This job requires patience and a good bit of elbow grease, but as long as you’re up for the physical labor, ripping out old floors is a project the average homeowner can accomplish in a weekend.
The process for removing both materials is about the same, so follow the steps below to learn how to remove vinyl or linoleum the DIY way.
Flooring Removal FAQs
How do you remove vinyl flooring adhesive?
Use a heat gun to help loosen the adhesive. Start in a corner and work your way around the room until it softens, then scrape the flooring glue away with a putty knife.
Does my vinyl flooring have asbestos?
If it was installed before the 1980s, it's possible there's asbestos underneath the vinyl sheet flooring. Typically, the asbestos is found on a felt-like material backing that manufacturers once used to provide a cushion beneath the vinyl.
4 Signs of Asbestos in Flooring:
- Installed prior to 1980.
- Oily, greasy appearance.
- Black or discolored adhesive.
- 9-inch, 12-inch or 18-inch floor tiles.
What's the cost to remove laminate flooring?
The cost to hire a professional for laminate floor removal is typically between $0.60 and $4.00 per square foot, according to Angi. However, you can cut costs by doing the demo work yourself. The total flooring replacement price will depend on the type of flooring you replace the old laminate with.
How hard is it to remove laminate flooring?
The process to get rid of old laminate flooring is pretty straightforward with the right tools. Newer vinyl flooring is generally not glued directly to the subfloor, making it easier to pull away. Older homes may need a little more elbow grease to scrape away old flooring adhesive. We recommend a heat gun to help loosen vinyl sheets glued to your subfloor.
How to Remove Vinyl or Linoleum Flooring in 5 Easy Steps
The most time-consuming aspect is removing the adhesive left behind when vinyl and linoleum are installed over a wood subfloor — which we'll cover in step 4. The rest of the job is pretty straightforward. Ready to get to work?
Step 1: Prepare to Remove Flooring
Before we get to the main event, there are a couple of prep steps you’ll need to complete. You probably already have most of these tools on hand, but anything you’re missing can be bought or rented pretty inexpensively from your nearest home improvement store.
Tools to Remove Linoleum or Vinyl Floor
Tools | /////Safety Gear |
|---|---|
Chisel | Work gloves |
Pliers | Long pants |
Flat pry bar | Sturdy shoes |
Utility knife | Knee pads |
Putty knife | Face mask |
Floor scraper* |
You may want to consider renting a 10 yard dumpster for this project. Sheets of linoleum are too heavy to bag up with your regular trash, especially if you're working on a large room. And if you're remodeling other areas of your kitchen, you'll need a convenient way to get rid of the bulky items like cabinets and countertops that your trash service won't take at the curb.
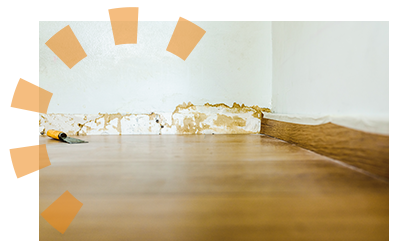
Step 2: Remove Baseboards
Before you can pull up the flooring, remove all the baseboards in your room. Be sure to mark the back of each piece with its location if you plan to reinstall them once your new floor is laid out.
- Wiggle your pry bar or chisel between the baseboard and the wall starting in a corner. If desired, slide a piece of wood or cardboard behind your tool to avoid scratching the wall.
- Pry with gentle, steady pressure until the board separates from the wall.
- Remove any nails with your pliers once you can reach them.
- Store baseboards away if you plan on reusing them.
Safety Tip
If your floor was laid before the 1980s, the adhesive may contain asbestos. To test yours, put on gloves and cut away a small piece, wetting it and the underlying adhesive with water as you pull it up. Bag it and take it to an asbestos abatement company.
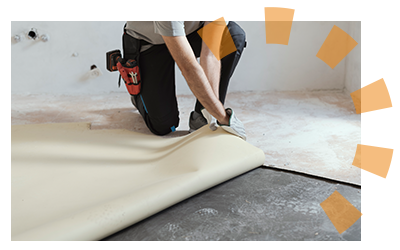
Step 3: Cut Out the Center of the Flooring
In most cases, vinyl and linoleum are only glued down along the perimeter of the room. This makes the majority of your removal pretty simple.
- Measure 10 inches from the wall and cut through the vinyl or linoleum with your utility knife, moving parallel to the wall around the perimeter of the room.
- Use your utility knife to slice this cut-away center into strips.
- Keep strips less than 18 inches wide and a few feet long to prevent them from getting too heavy and unwieldy to carry out of the room.
- Throw the strips of flooring into your dumpster as you go.

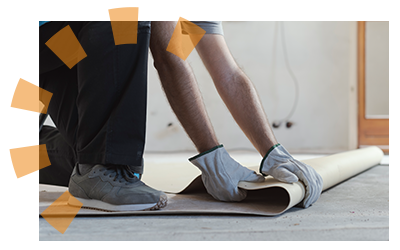
Step 4: Tear Up Edge Flooring
Now it’s time to remove the portion of your vinyl or linoleum that was glued down. You’ll probably need to put your back into it, so work at a comfortable pace and take breaks whenever you need.
- Work your pry bar along a section of the flooring to begin loosening the edge.
- Use your chisel or putty knife to chip away more adhesive once you’ve pried enough away to get under the edge.
- When there is enough loose for you to get a grip on it, pull back firmly until you can’t peel away anymore.
- Cut off the loose strip with your utility knife and move it out of your work area. Load the old pieces of flooring into the dumpster.
- Repeat these steps until you’ve removed all the remaining flooring.
Keep in Mind
If the adhesive is too hard to chip away with a chisel or putty knife, fire up your heat gun. Apply it to the adhesive until it softens enough for you to peel back the flooring or continue chipping.
Step 5: Scrape Away the Remaining Adhesive
Once the flooring is gone, you’ll need to get rid of the leftover adhesive. If you don’t remove the linoleum glue from the underlying plywood, it will be difficult to properly install your new floor—you can even void its warranty. This will probably be the most time-consuming part of the project, so give yourself plenty of leeway for breaks.
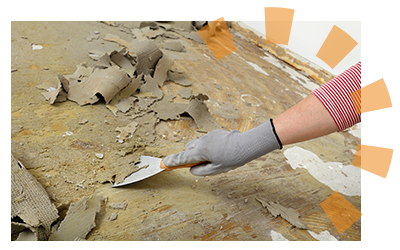
How to Remove Linoleum or Vinyl Flooring Glue
- Turn the heat gun on low and allow it to warm up. You can raise the setting later if necessary.
- Starting at one corner of the room, apply the heat gun to a section of adhesive until it softens.
- Scrape the softened adhesive away with your putty knife.
- Repeat these steps until you’ve removed the glue from the entire room.
Time for Your Brand New Floor!
Now that you’ve removed your uninspiring vinyl or linoleum, you’re one step closer to a transformed floor. Still on the fence about what to replace the old stuff with? Check out our guide to choosing the best flooring for your family.
Removing the old linoleum as part of a bigger kitchen remodel? Keep our complete kitchen demo guide on hand for your next project.
What Do You Think?
Getting rid of old flooring? We're listening. Head over to Twitter or Facebook,
and use #dumpstersblog to join the conversation.


